
Imagine coming home after a long day and finding that a room light suddenly stops working. You check the bulb, but the problem is actually a loose switch connection. Instead of waiting hours for an electrician, basic electrical repair knowledge could help you solve the issue safely within minutes. This is why learning DIY electrical repairs is becoming increasingly important for homeowners, students, technicians, and beginners.
Electrical systems are part of everyday life. From switches and sockets to circuit breakers and wiring, small electrical problems happen regularly in homes and workplaces. Understanding basic repair methods not only saves money but also improves safety and confidence when handling electrical equipment.
This DIY Electrical Repairs Guide will explain the complete process in simple and easy English. You will learn the DIY electrical repairs working principle, types of repairs, tools, safety methods, advantages and disadvantages, troubleshooting techniques, and modern electrical repair trends. Whether you are an electrical student or someone learning basic maintenance skills, this guide will help you build strong practical knowledge step by step.
What is DIY Electrical Repairs Guide?
DIY electrical repairs refer to simple electrical maintenance and troubleshooting tasks performed without hiring a professional electrician. “DIY” means “Do It Yourself.”
These repairs usually involve fixing small electrical problems safely using basic tools and electrical knowledge.
Simple Explanation
DIY electrical repair means identifying an electrical issue, understanding the cause, and fixing it carefully while following safety procedures.
Practical Example
Examples of DIY electrical repairs include:
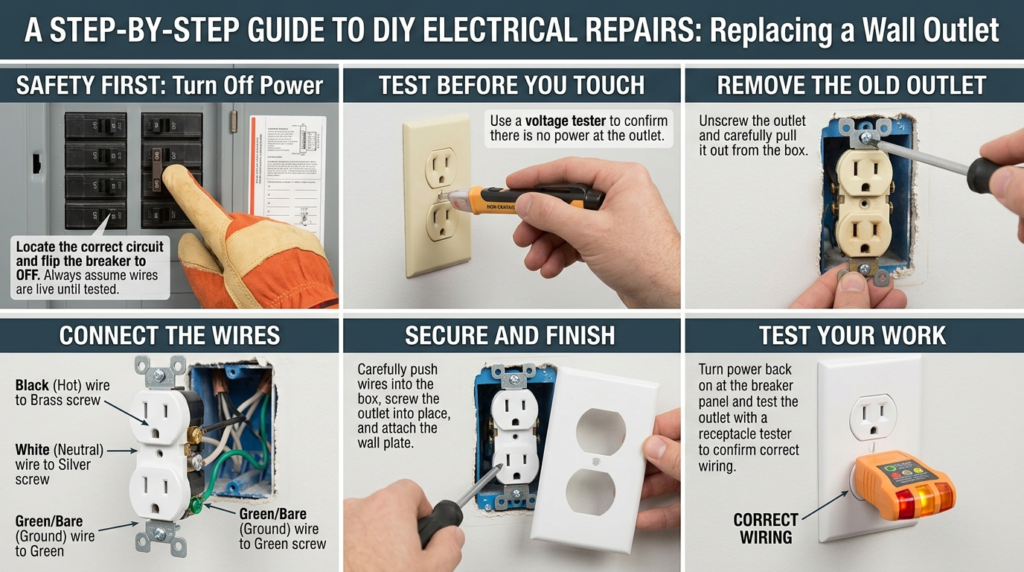
- Replacing a damaged switch
- Fixing a loose socket
- Changing a circuit breaker
- Repairing a broken extension cord
- Replacing light fixtures
These are common tasks that beginners can learn with proper guidance and safety awareness.
DIY Electrical Repairs Working Principle
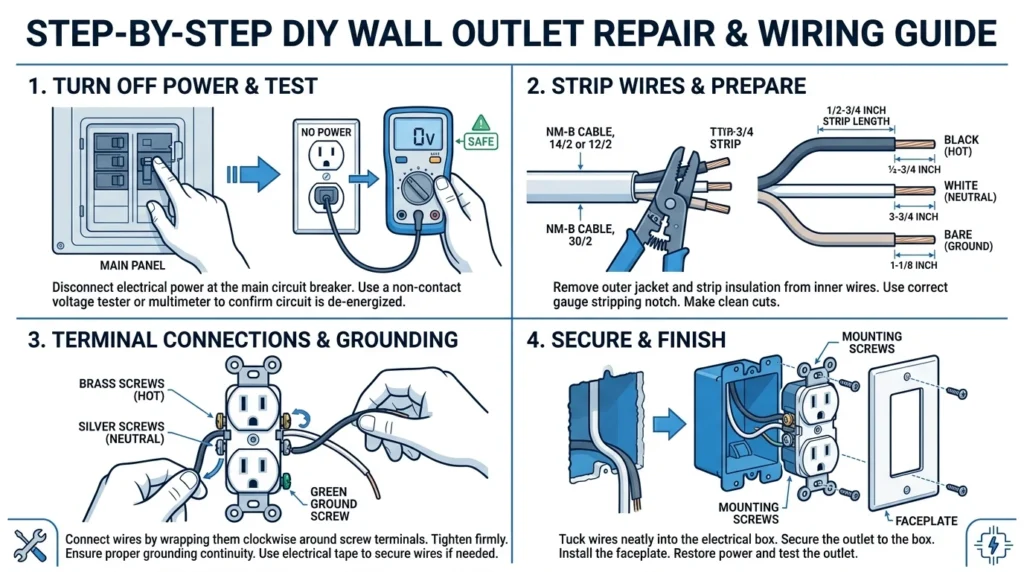
The DIY electrical repairs working principle is based on identifying faults, isolating power, repairing damaged parts, and restoring safe electrical operation.The DIY Electrical Repairs Working Principle is based on identifying, diagnosing, and fixing minor electrical problems using basic tools and electrical knowledge while following proper safety procedures. In simple words, it involves understanding how electricity flows through a circuit and locating faults such as loose connections, damaged wires, faulty switches, or defective outlets. The repair process usually begins by turning off the power supply to ensure safety, followed by inspecting the circuit, testing components with tools like a multimeter, and replacing or repairing the faulty part. Once the repair is completed, the circuit is tested to verify that it operates correctly and safely. DIY electrical repairs are commonly performed for simple tasks such as replacing switches, outlets, light fixtures, or circuit breakers. However, proper precautions must always be taken because working with electricity can be dangerous. Understanding the working principle of DIY electrical repairs helps beginners and technicians perform basic maintenance safely, improve troubleshooting skills, and maintain reliable electrical systems.
Step-by-Step Working Principle
Identify the Problem
First, observe the electrical issue carefully.
Examples include:
- Lights not working
- Circuit breaker tripping
- Sparking socket
- Burning smell
- Flickering bulbs
Turn Off the Power
Always disconnect the electrical supply before touching wires or components.
This is the most important safety step.
Test the Circuit
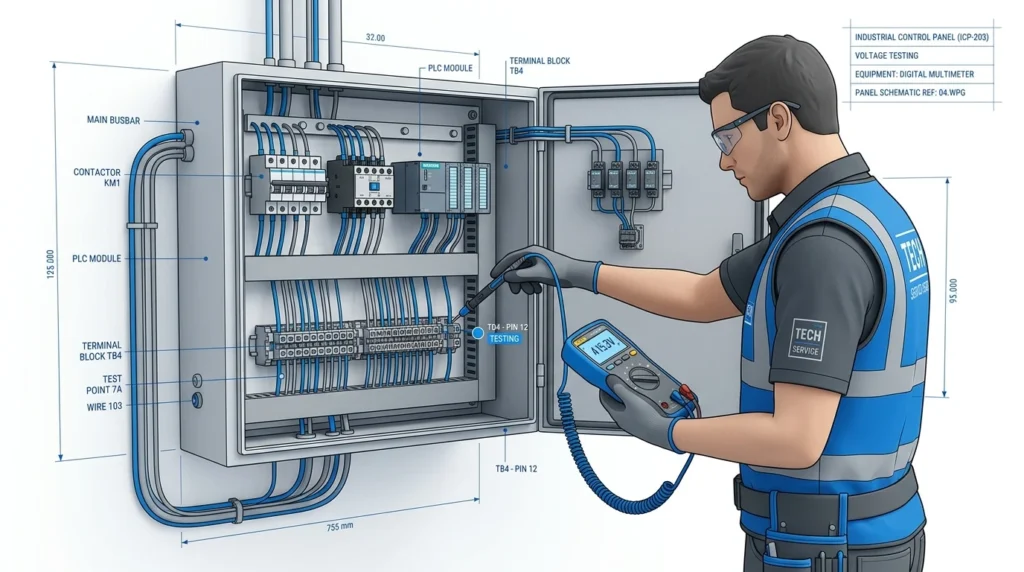
Testing the circuit is the final and most important step after completing any electrical installation or wiring work. It ensures that all connections are correct, components are functioning properly, and the circuit operates safely without faults. Before applying power, a visual inspection should be performed to check for loose wires, damaged insulation, or incorrect connections. After inspection, suitable testing instruments such as a multimeter, continuity tester, or insulation tester can be used to verify circuit continuity, voltage levels, and resistance values. Once the power supply is switched on, the circuit should be monitored carefully to ensure that current flows correctly and all devices operate as intended. If any abnormal behavior, overheating, sparks, or unexpected tripping occurs, the power should be disconnected immediately and the fault should be investigated. Proper circuit testing improves safety, prevents equipment damage, and ensures reliable performance of electrical systems in residential, commercial, and industrial applications.Use a voltage tester or multimeter to confirm that power is completely OFF.
Inspect Components
Check for:
- Loose wires
- Burnt insulation
- Broken switches
- Damaged plugs
- Faulty connections
Repair or Replace
Fix the damaged part carefully using proper tools and insulated materials.
Restore Power
Turn the power back ON and test the system.
Easy Analogy
Think of an electrical system like a water pipeline. If water stops flowing, you inspect the valve, pipe, or blockage. Electrical troubleshooting works similarly by checking the flow of current and finding interruptions.
Types / Classification
Basic DIY Electrical Repairs
These repairs are simple and suitable for beginners.
- Replacing bulbs
- Changing switches
- Repairing plugs
- Tightening loose terminals
Best For
- Home users
- Students
- Beginners
Intermediate Electrical Repairs
These repairs require more technical understanding.
- Replacing circuit breakers
- Repairing ceiling fans
- Installing outlets
- Testing wiring continuity
Best For
- Technicians
- Electrical students
Advanced DIY Electrical Repairs
These tasks involve higher risks and require advanced electrical skills.
- Panel wiring
- Motor troubleshooting
- Distribution board maintenance
- Generator wiring
Best For
- Experienced technicians
- Engineers
Emergency Electrical Repairs
These repairs focus on immediate safety issues.
- Burning wires
- Electrical sparks
- Short circuits
- Power failure troubleshooting
Important Note
Major emergency repairs should always involve professional electricians.
Main Components
Multimeter
A multimeter measures voltage, current, and resistance.
Function
- Detects electrical faults
- Checks continuity
- Measures supply voltage
Insulated Screwdrivers
These screwdrivers protect users from electric shock.
Function
- Tightening terminals
- Removing switches and sockets
Voltage Tester
A voltage tester checks whether electrical power is present.
Function
- Ensures safe working conditions
Electrical Tape
Electrical tape insulates exposed wires.
Function
- Prevents short circuits
- Protects wire joints
Circuit Breaker
A circuit breaker protects the system from overloads and short circuits.
Function
- Automatically disconnects faulty circuits
Wire Stripper
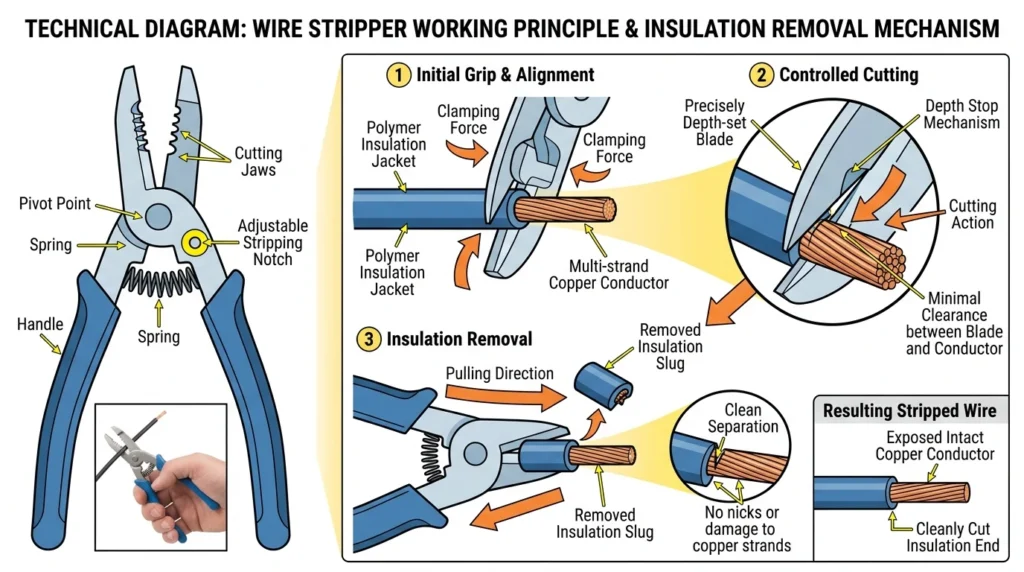
A wire stripper removes insulation from wires safely.A wire stripper is a hand tool used to remove the insulation or protective coating from electrical wires without damaging the metal conductor inside. It is one of the most important tools for electricians, technicians, and electrical students because proper wire preparation is essential for safe and reliable electrical connections. A wire stripper contains specially designed cutting slots for different wire sizes, allowing the user to strip insulation quickly and accurately. In simple words, it helps expose the bare conductor so that the wire can be connected to terminals, switches, outlets, or other electrical components. Wire strippers are commonly used in electrical installations, maintenance work, control panel wiring, and electronic circuit assembly. Using the correct wire stripper improves connection quality, reduces the risk of conductor damage, and enhances overall electrical safety. Understanding how to use a wire stripper properly is a fundamental skill for anyone working with electrical systems and wiring projects.
Function
- Prepares wires for connection
Advantages of DIY Electrical Repairs
Understanding DIY electrical repairs advantages and disadvantages helps users make smart decisions.
Advantages
- Saves repair costs
- Builds practical technical skills
- Helps in emergency situations
- Improves troubleshooting ability
- Increases electrical safety awareness
- Reduces downtime for small faults
- Gives confidence in handling minor repairs
Real-World Benefits
A homeowner who understands basic electrical repairs can quickly restore a tripped breaker or replace a faulty socket without waiting for outside help.
Students also gain valuable hands-on experience through safe DIY practice.
Disadvantages / Limitations
DIY Electrical Repairs Disadvantages
- Risk of electric shock
- Fire hazards if repairs are incorrect
- Possible equipment damage
- Legal restrictions in some regions
- Complex systems require professionals
- Incorrect wiring can create future faults
Practical Limitations
DIY repairs are suitable only for minor electrical problems. High-voltage systems, industrial installations, and complex wiring jobs should always be handled by certified electricians.
DIY Electrical Repairs Applications
Home Applications
DIY electrical repairs are widely used in homes.
Common Uses
- Replacing light switches
- Installing fans
- Repairing plugs
- Fixing lighting circuits
Educational Applications
Electrical students use DIY repair practice to improve technical skills.
Benefits
- Better understanding of circuits
- Practical troubleshooting experience
- Safety training
Workshop Applications
Technicians perform small equipment repairs regularly.
- Power tool repair
- Extension cord maintenance
- Machine switch replacement
Modern Technology Applications
Modern smart homes require basic repair knowledge for:
- Smart switches
- LED lighting
- Solar inverters
- Home automation systems
DIY Repairs vs Professional Electrical Services
Understanding the difference between DIY electrical repairs and professional services is important for safety and decision-making.
| Feature | DIY Electrical Repairs | Professional Electrical Services |
| Cost | Lower | Higher |
| Skill Requirement | Basic to moderate | Advanced expertise |
| Safety Level | Depends on knowledge | Professional safety standards |
| Best For | Minor repairs | Complex systems |
| Time | Immediate small fixes | Scheduled service |
| Risk Level | Higher for beginners | Lower |
| Equipment | Basic tools | Advanced tools |
| Legal Compliance | Limited | Certified work |
Selection Guide
How to Choose the Right DIY Repair Task
Not every electrical problem should be repaired personally.
Suitable DIY Repairs
Choose DIY repairs when:
- The problem is simple
- Power can be isolated safely
- Proper tools are available
- You understand the repair process
- Replacing switches
- Repairing plugs
- Tightening connections
When to Call a Professional
Avoid DIY repairs when:
- Main panel wiring is involved
- You smell burning insulation
- Water is near electrical systems
- High voltage equipment is used
- You are unsure about the fault
Tips for Beginners
- Always turn OFF power first
- Use insulated tools only
- Learn basic wiring colors
- Never work with wet hands
- Test circuits before touching wires
- Start with small repairs
- Follow local electrical codes
Common Problems & Solutions
Why Does a Circuit Breaker Keep Tripping?
Cause
- Overloaded circuit
- Short circuit
- Faulty appliance
Solution
- Disconnect extra devices
- Check damaged wiring
- Reset breaker carefully
Why Are Lights Flickering?
Cause
- Loose connection
- Faulty switch
- Voltage fluctuation
Solution
- Tighten terminals
- Replace damaged switch
- Check supply voltage
Why Is a Socket Not Working?
Cause
- Loose wiring
- Burnt socket
- Tripped breaker
Solution
- Turn OFF power
- Inspect connections
- Replace damaged socket
Why Does a Plug Heat Up?
Cause
- Overload
- Poor contact
- Loose terminals
Solution
- Reduce electrical load
- Tighten connections
- Replace damaged plug
Why Is There a Burning Smell?
Cause
- Overheating wires
- Short circuit
- Insulation damage
Solution
- Disconnect power immediately
- Inspect wiring
- Call a professional if necessary
How to Avoid Electric Shock?
Safety Tips
- Wear insulated gloves
- Use voltage testers
- Never touch live wires
- Keep work area dry
Future Trends
Electrical repair technology is improving rapidly with modern innovations.
Smart Diagnostic Tools
Modern digital multimeters now provide faster and more accurate troubleshooting features.
Smart Home Systems
Smart homes use advanced electrical systems that require specialized repair knowledge.
Wireless Monitoring
Modern electrical systems can detect faults automatically using wireless monitoring sensors.
AI-Based Fault Detection
Advanced systems can identify wiring faults and overload conditions before failures occur.
Safer Electrical Components
Manufacturers are developing safer switches, breakers, and smart protective devices.
Renewable Energy Repairs
Solar panel systems and battery storage units are increasing the demand for DC electrical troubleshooting skills.
Conclusion
This DIY Electrical Repairs Guide explained the essential knowledge required for safe and effective electrical troubleshooting. Learning the DIY electrical repairs working principle helps students, technicians, and beginners understand how electrical systems operate and how common faults can be repaired safely.
DIY electrical repairs offer many advantages such as cost savings, practical experience, and faster minor troubleshooting. However, users must also understand the limitations and risks involved. Safety should always be the highest priority when working with electricity.
For beginners, starting with simple tasks like replacing switches or repairing plugs is the best approach. As knowledge and confidence improve, more advanced troubleshooting skills can be developed gradually.
Electrical systems continue to evolve with smart technology and renewable energy solutions, making practical electrical repair knowledge more valuable than ever before.